The Render Module
The Render module generates the 3D visualisation output in IRIS Explorer TM. It takes Geometry data (see the Data in IRIS Explorer section) and produces a 3D scene from it. This chapter provides an overview of how to use the Render module.
The Render module takes the geometry data present at its input ports and combines it into a scene. It follows the concept of a camera pointing at scene. A wide range of controls are available via the pull-down menus along the top of the window and a pop-up menu, obtained by clicking with the right-hand mouse button in the window. Additional controls on the interface can be toggled on and off by pressing the right-hand mouse button in the window and selecting Decoration. Controls will appear around the edge of the window. When they are switched on, the window will look like this:
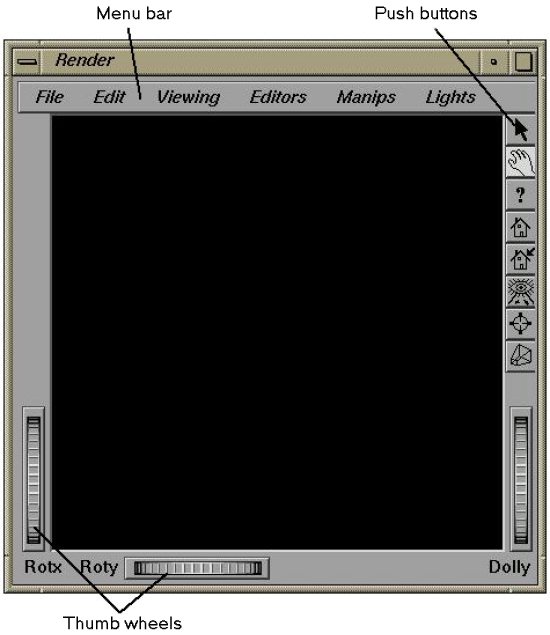
Figure 9.1: The Render module with the Decoration visible
Viewing and Picking in Render
- Viewing - camera parameters can be changed
- Picking - objects can be manipulated, or queried
- Viewing - hand
- Picking - arrow
Render supports two modes which determine how mouse interactions will be dealt with. These are:
The Cursor icon in the drawing area depends on the mode:
Switching between them can either be achieved using two of the decoration buttons (see Push Buttons in Render below), or by pressing the <Esc> key.
Viewers in Render
- Left-hand button - Rotate the scene (using a virtual trackball)
- <Shift> + left-hand button - Translate up, down, left, right
- <Shift> + <Ctrl> + left-hand button - Dolly in, out
Changing the camera attributes is done via a Viewer. The default Viewer is called Examiner. Other viewers are available from the Viewing menu.
The mouse controls in Examiner behave as follows.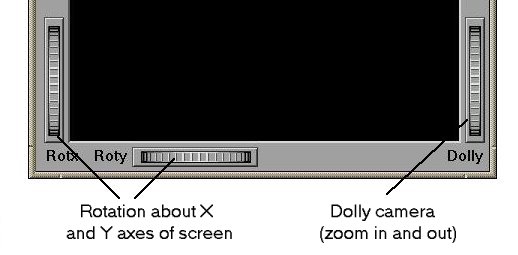
Figure 9.2: The Decoration functions
Picking in Render
- appearance using the Material Editor
- colour - using the Color Editor
- scale, orientation and location - using the Transform Sliders
There are two modes for picking in Render which can be switched between using the Viewing menu.
1. Pick/Edit mode
In this mode, picking is done by clicking the left-hand mouse button on an object in the scene. The selected object then has a red box drawn around it and you can then edit the objects:
These editors are available from Editors on the menu bar. See also Manips on the menu bar for manipulators which can be used to transform the selected object.
The selected object is also passed out of Render's Picked Geometry output port for use by another module. The Edit menu can be used to control the picking behaviour.
2. User Pick mode
-
Information about selected object is written to a Pick data type and
passed out of Render's Pick output port for use by other modules.
Push Buttons in Render
When the Decoration is switched on, the buttons on the right-hand edge of the window deliver some of the most useful controls for viewing. The top seven are generic, the others are viewer specific. Their functions are:
![]() Switch to picking mode
Switch to picking mode
![]() Switch to viewing mode
Switch to viewing mode
![]() Bring up the help screen for
the current viewer
Bring up the help screen for
the current viewer
![]() Return camera to home position
Return camera to home position
![]() Save the current camera position as the
home state
Save the current camera position as the
home state
![]() Move the camera to view all of the
geometry currently in Render (very useful for finding lost objects!)
Move the camera to view all of the
geometry currently in Render (very useful for finding lost objects!)
![]() Move the camera to seek the next
selected geometry, and to centre it in the viewing area
Move the camera to seek the next
selected geometry, and to centre it in the viewing area
![]() Switch between perspective and
orthographic cameras (Examiner viewer only)
Switch between perspective and
orthographic cameras (Examiner viewer only)
The Menu Bar in Render

Figure 9.3: The Render module menu bar
- File:
- Options for printing and saving the current scene (in Inventor, VRML, or
image format), and the environment.
- Edit:
- Controls the way in which picked geometry is passed out of the module.
The whole scene may be picked, or individual components. In the latter case, single
elements may be selected (when Single Selection is turned on), or the picked
scene may be accumulated by picking on the separate elements (when Toggle
Selection is turned on). In Shift Selection mode, the two behaviours may
be switched by depressing the Shift key when picking.
- Viewing:
- Picking, viewer selection, special effects (fog, anti-aliasing, transparency).
Also contains editor for background colour of scene. The background colour is saved when
the map containing the module is saved.
- Editors:
- Material properties, colour, transformation - of currently selected object.
- Manips:
- Further ways to transform the currently selected object.
- Lights:
- Create and edit lights in the scene.
Previous : Contents : Next © The Numerical Algorithms Group Ltd. Oxford, UK. 1999